


random user submitted photo
Sonex Fuel Tank & Oops Fittings
Re: Sonex Fuel Tank & Oops Fittings
![]() by DCASonex » Fri May 15, 2015 8:29 am
by DCASonex » Fri May 15, 2015 8:29 am
SonexN76ET wrote:With all due respect, you can NOT use most step drill bits to install the oops fittings! The plastic on the tank is too thick. A step drill will bevel the hole where the outside will be with a wider hole then what makes it through to the inside of the tank. In other words, you will have a stepped hole in your tank that the oops fittings will not go through and seal properly
Jake
******************************
Successfully used a step drill to drill out both sizes of mine. Do need to position the bit far out in the chuck to pass all the way through. Have a couple of those bits, some with hex shank, and "might" have used a common hex shank screwdriver extension with one of those. but think it was only held in chuck of 1/2" battery operated drill where gripping part of chuck extends well beyond chuck body when gripping smaller diameter shanks allowing added depth before chuck body contacts outside of tank.
David A.
- DCASonex
- Posts: 904
- Joined: Mon Sep 12, 2011 8:04 pm
- Location: Western NY USA
Re: Sonex Fuel Tank & Oops Fittings
![]() by SonexN76ET » Fri May 15, 2015 9:26 am
by SonexN76ET » Fri May 15, 2015 9:26 am
I am glad to hear some of you were able to get a step drill bit to work on drilling out the holes for Ops Fittings. I had said you can not use MOST step drill bits. The point I meant to make is that the step on most bits is NOT as wide as the tank is deep. How do I know? Because when I end to drill through my tank with my step drill bits they did not make it through at the designated step and I had to use a regular bit to make it through the tank.
As far as using reducers simply screwed into the plastic tank, I conducted an experiment. I screwed in a reducer and I got it in really tight. I thought to myself, there is no way that is coming out. But continuing the experiment I put a fitting on it with a short metal fuel line. I wiggled the fuel line for a short time and the reducer started to come loose out of the tank. Once it loosened up it progressively got looser as the threads stripped out of the plastic. Putting a nut on the inside of the tank would have probability locked it down OK. But I did not have the ability to get a nut into the tank and onto the reducer. I did the same testbwith an Oops fitting and it held.
Like many techniques, your mileage will vary. But like in medicine and science, before a theory is adopted it undergoes significant testing and has to be repeatable and verifiable. The danger with just screwing a bushing into the plastic and expecting it to hold is that at first it will appear very strong but then subjecting it to vibration and then if something bumps an attached line or fitting and the reducer bushing loosens up on the threads the fuel would likely start to gush past the reducer and into the cockpit.
Be safe out there!
Jake
-

SonexN76ET - Posts: 490
- Joined: Tue Aug 27, 2013 2:39 pm
- Location: Atlanta
Re: Sonex Fuel Tank & Oops Fittings
![]() by radfordc » Fri May 15, 2015 9:42 am
by radfordc » Fri May 15, 2015 9:42 am
SonexN76ET wrote:Secondly, I need to state that it is wrong and just plain dangerous advice some have given on using reducers simply screwed into the plastic tank instead of using the oops fittings.
Since I've been accused of offering dangerous advice, I better explain myself. My Sonex was built in 2001 and had a very early black plastic tank. I bought the plane in 2006 and the tank started leaking in 2007. At that time there were no "oops fittings" available, so my option was a new tank or devise a solution on my own. I decided to use the brass reducers screwed into the plastic. I figured if they leaked I wouldn't be any worse off than before and could replace the tank then. The repair was a success and I haven't had any leaks since then. The suggestion that they will quickly loosen and leak has not been evident.
If the "oops fitting" had been available back in 2007 I would have probably used them just because the "good guys" said to. However, I believe the screwed in brass reducers are a much easier solution and seem to be just as effective. My opinion only....
- radfordc
- Posts: 573
- Joined: Fri Jun 03, 2011 9:39 am
Re: Sonex Fuel Tank & Oops Fittings
![]() by SonexN76ET » Fri May 15, 2015 10:05 am
by SonexN76ET » Fri May 15, 2015 10:05 am
Perhaps the earlier black plastic fuel tanks were thicker and the black plastic would hold threads better than the clear version.
-
SonexN76ET - Posts: 490
- Joined: Tue Aug 27, 2013 2:39 pm
- Location: Atlanta
Re: Sonex Fuel Tank & Oops Fittings
![]() by wlarson861 » Fri May 15, 2015 3:47 pm
by wlarson861 » Fri May 15, 2015 3:47 pm
I have the translucent tank. When I drilled out the fuel line fitting the tank material was over 1 inch thick. In order to use the Oops fitting I tried grinding the inside surface. It didn't work. I used John Davis' pictures on the american sonex association website as a guide. reducer fitting screwed into tapped aluminum plate and screwed into the plastic tank. the outside of the tank and back of the aluminum plate were slathered with Proseal and pk screws secure the plate to the tank. I haven't had a leak since (Knock wood). If I had known of Charlie's method I would have tried that first because Proseal is expensive and a mess to work with in tight quarters.
Bill Larson
N861SX
Sonex, polished, tail wheel, Generation 4 Jabiru 3300
N861SX
Sonex, polished, tail wheel, Generation 4 Jabiru 3300
- wlarson861
- Posts: 497
- Joined: Wed Dec 05, 2012 11:41 pm
Re: Sonex Fuel Tank & Oops Fittings
![]() by Bryan Cotton » Sat May 16, 2015 11:17 am
by Bryan Cotton » Sat May 16, 2015 11:17 am
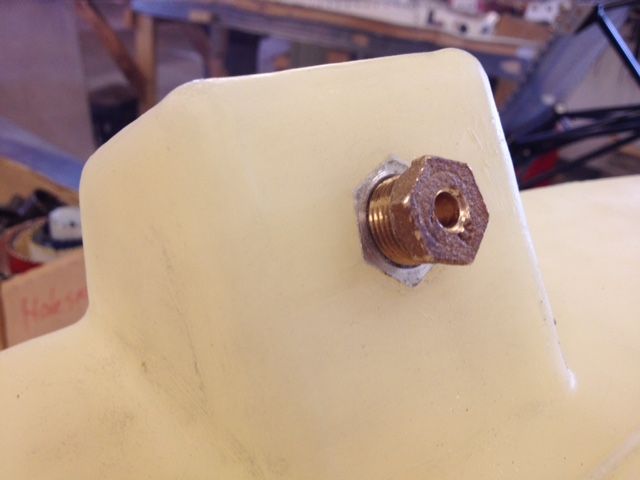
I went ahead with the holesaw method. For the big fitting it was great. For the small fitting not so great.
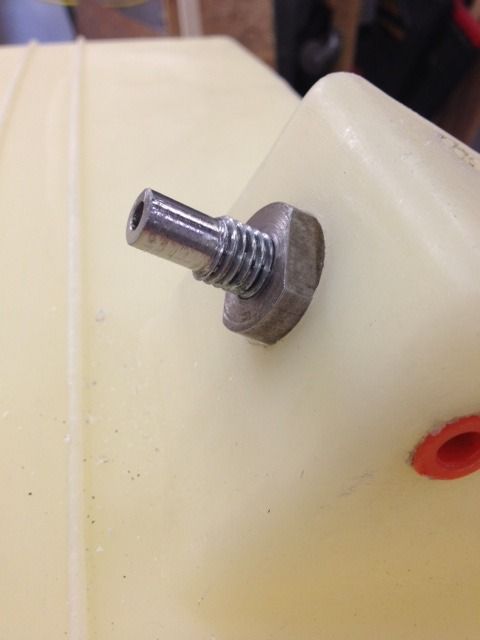
Here is my brass plug with a 1/4" pilot hole:
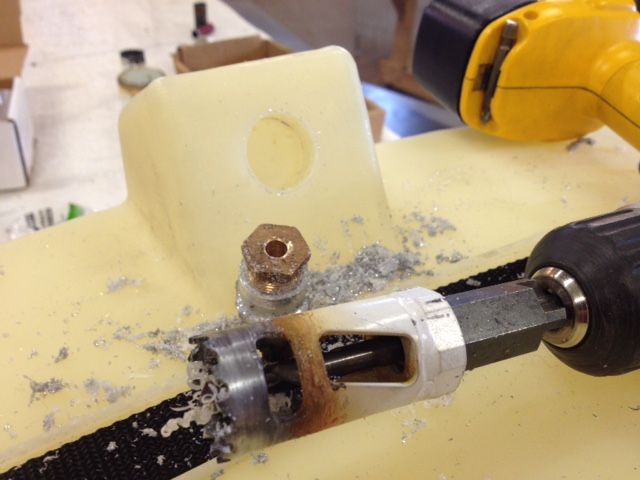
Holesaw ready to go:
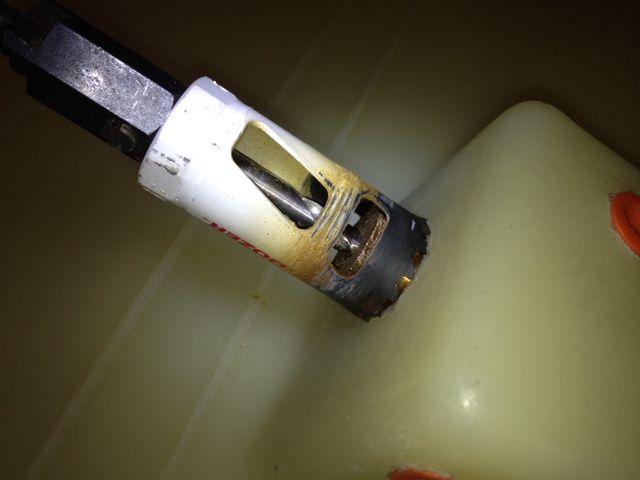
Cut out:
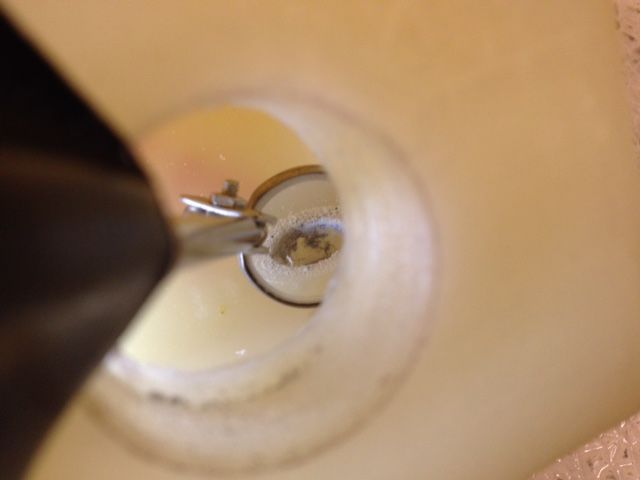
David A lent me this nifty tool. Shown is the one for the small fitting. It is made for a bolt and clamps some abrasive material to a backing washer:
You insert the tool, chuck it up in your drill, and sand the inside ridge flat:
Here is a look at the sanded inside fitting:
On the small fitting the holesaw grabbed and spun it. I think it is still tight enough though.
Here is my brass plug with a 1/4" pilot hole:

Holesaw ready to go:

Cut out:

David A lent me this nifty tool. Shown is the one for the small fitting. It is made for a bolt and clamps some abrasive material to a backing washer:

You insert the tool, chuck it up in your drill, and sand the inside ridge flat:

Here is a look at the sanded inside fitting:

On the small fitting the holesaw grabbed and spun it. I think it is still tight enough though.
Bryan Cotton
Poplar Grove, IL C77
Waiex 191 N191YX
Taildragger, Aerovee, acro ailerons
dual sticks with sport trainer controls
Prebuilt spars and machined angle kit
Year 2 flying and approaching 200 hours December 23
Poplar Grove, IL C77
Waiex 191 N191YX
Taildragger, Aerovee, acro ailerons
dual sticks with sport trainer controls
Prebuilt spars and machined angle kit
Year 2 flying and approaching 200 hours December 23
-

Bryan Cotton - Posts: 5034
- Joined: Mon Jul 01, 2013 9:54 pm
- Location: C77
Re: Sonex Fuel Tank & Oops Fittings
![]() by Waiex 49 » Sat May 16, 2015 2:06 pm
by Waiex 49 » Sat May 16, 2015 2:06 pm
Hi Bryan,
Thanks for sharing your experiences on the fitting replacements. Looks like the hole saw worked pretty well on the larger fitting. The 1" twist drill was a bit tricky for me to control accurately, so I think the hole saw running with the 1/4" pilot is a good way to go. The smaller fittings seem to present a challenge as the fittings tend to break loose and spin, whether you are using a twist drill or a hole saw, making it a challenge to end up with a nice, clean 9/16" hole.
Glad to see you were able to borrow David's excellent tools for smoothing the inside surfaces. He was kind to lend them to me, and I don't think I could have finished the job without them.
If you go with the "oops" fittings consider using a washer on the outside instead of the o-ring. The outer o-ring doesn't contribute to sealing the tank and squishes out of position making it difficult to get the "oops" fitting to seat properly.
I used some blue locktite on the "oops" fittings, in hopes that it would prevent the fittings from loosening up in the future.
Good luck with your fuel tank repairs! I hope to reinstall my tank tomorrow.
Don
- Waiex 49
Re: Sonex Fuel Tank & Oops Fittings
![]() by WaiexN143NM » Sat May 16, 2015 2:26 pm
by WaiexN143NM » Sat May 16, 2015 2:26 pm
Hi all thanks for sharing, I think the ideal solution is the molded tanks with no fittings at all. The builder can then use the oops fittings where needed. Sonex are u listening?????????????? Will be easy to drill and very little work inside to dress the hole. The oops fittings I received have machined grooves for the o rings.
WaiexN143NM
Michael RADTKE
WaiexN143NM
Michael RADTKE
- WaiexN143NM
- Posts: 1156
- Joined: Mon Sep 15, 2014 1:04 am
- Location: SF CA, Tucson AZ, palm springs CA
Re: Sonex Fuel Tank & Oops Fittings
![]() by Bryan Cotton » Sat May 16, 2015 2:52 pm
by Bryan Cotton » Sat May 16, 2015 2:52 pm
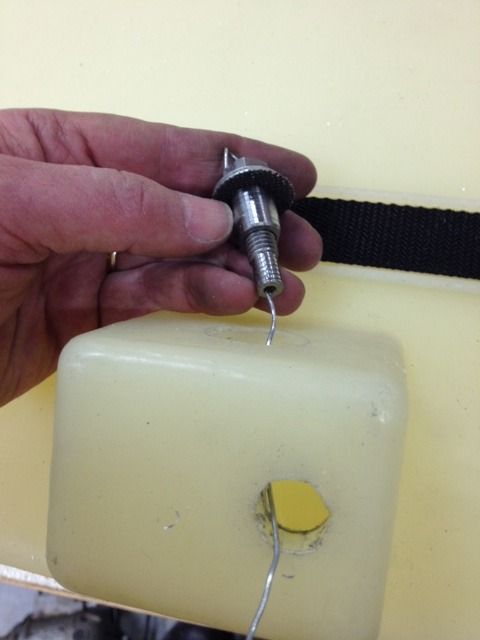
Here are a couple details for documentation's sake. To fish the wire from the fuel filler to the sump I used a special stick I made.
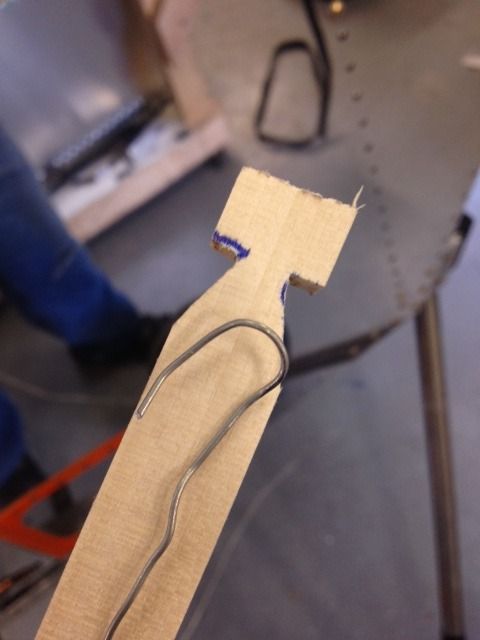
You poke the stick through, fish the wire over it, and pull it back. Maybe this will save somebody a few minutes of thinking or frustration.
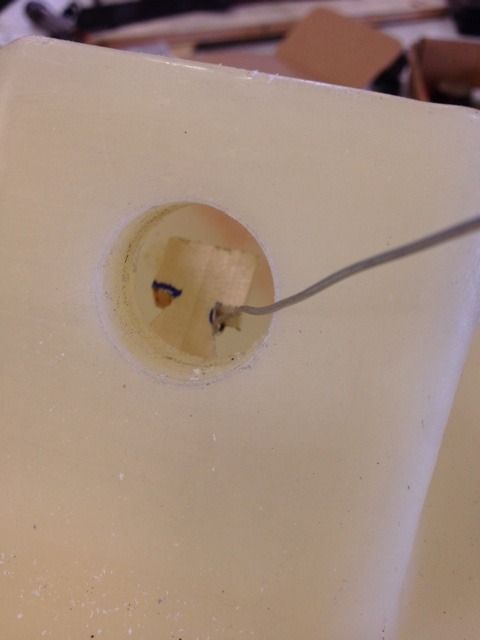
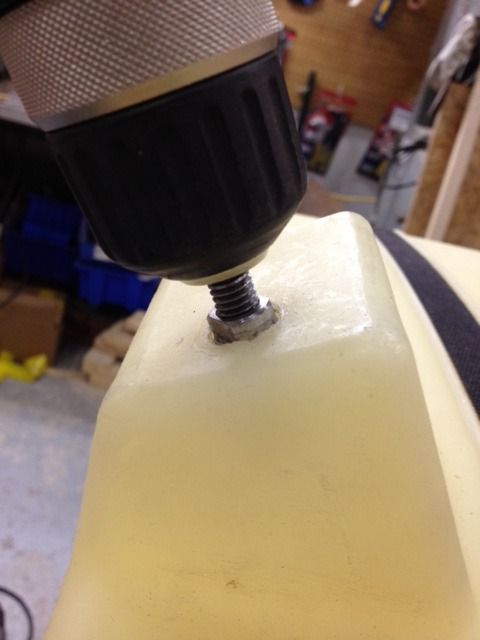
David's tools are excellent. Another view before I chucked it up in the drill:
I have done one 1/8" fitting by each method. The step drill one came out better. Ironically I still spun the fitting on that one. My steam punk drill takes about a minute to coast down so that sucked. I used the dremel with a high speed cutter and I finished up with the holesaw.

You poke the stick through, fish the wire over it, and pull it back. Maybe this will save somebody a few minutes of thinking or frustration.

David's tools are excellent. Another view before I chucked it up in the drill:

I have done one 1/8" fitting by each method. The step drill one came out better. Ironically I still spun the fitting on that one. My steam punk drill takes about a minute to coast down so that sucked. I used the dremel with a high speed cutter and I finished up with the holesaw.
Bryan Cotton
Poplar Grove, IL C77
Waiex 191 N191YX
Taildragger, Aerovee, acro ailerons
dual sticks with sport trainer controls
Prebuilt spars and machined angle kit
Year 2 flying and approaching 200 hours December 23
Poplar Grove, IL C77
Waiex 191 N191YX
Taildragger, Aerovee, acro ailerons
dual sticks with sport trainer controls
Prebuilt spars and machined angle kit
Year 2 flying and approaching 200 hours December 23
-
Bryan Cotton - Posts: 5034
- Joined: Mon Jul 01, 2013 9:54 pm
- Location: C77
Re: Sonex Fuel Tank & Oops Fittings
![]() by Waiex 49 » Sun May 17, 2015 3:04 pm
by Waiex 49 » Sun May 17, 2015 3:04 pm
Installed my repaired fuel tank today!
Nothing is hooked up yet, but the tank is in position and secured in position by the metal straps.
I tried following the Sonex fuel tank installation instructions, but I could not abide the idea of forcing in the fuel tank with my feet.
In my way of thinking nothing should have to be forced into position.
I think the Sonex instructions are not the best way to remove or install the fuel tank.
To facilitate the easy removal and installation of the fuel tank I removed both left and right rudder peddel attach brackets. This was easy to do. There are five rivets and two bolts to remove in order to take off the brackets, with easy access from the outside of the aircraft. I had the brakets removed in under 10 minutes.
With the brackets out of the way I had the tank installed in under a minute!
Just another data point for those unfortunate enough to be playing with fuel tank repairs instead of flying their planes.
The RV formation flying group featured in the Rio Linda video (good job Mike) are practicing today at LHM. Fun to watch while I hang out in the man cave (aircraft hangar).
Don
Last edited by Waiex 49 on Sun May 17, 2015 9:22 pm, edited 2 times in total.
- Waiex 49
Return to Technical Write-Ups and FAQs
Who is online
Users browsing this forum: No registered users and 9 guests