


random user submitted photo
Ken's Sonex 1243
Re: Ken's Sonex 1243
![]() by Bryan Cotton » Tue Nov 06, 2018 2:21 pm
by Bryan Cotton » Tue Nov 06, 2018 2:21 pm
I am a believer in using a V block to drill holes in round things. Mine looks like this:
https://www.amazon.com/Eagle-America-448-5990-Center-V-Block/dp/B00G3A2NOM/ref=mp_s_a_1_1?ie=UTF8&qid=1541528368&sr=8-1&pi=AC_SX236_SY340_FMwebp_QL65&keywords=drill+press+v+block&dpPl=1&dpID=318osfgOvLL&ref=plSrch
https://www.amazon.com/Eagle-America-448-5990-Center-V-Block/dp/B00G3A2NOM/ref=mp_s_a_1_1?ie=UTF8&qid=1541528368&sr=8-1&pi=AC_SX236_SY340_FMwebp_QL65&keywords=drill+press+v+block&dpPl=1&dpID=318osfgOvLL&ref=plSrch
Bryan Cotton
Poplar Grove, IL C77
Waiex 191 N191YX
Taildragger, Aerovee, acro ailerons
dual sticks with sport trainer controls
Prebuilt spars and machined angle kit
Year 2 flying and approaching 200 hours December 23
Poplar Grove, IL C77
Waiex 191 N191YX
Taildragger, Aerovee, acro ailerons
dual sticks with sport trainer controls
Prebuilt spars and machined angle kit
Year 2 flying and approaching 200 hours December 23
-

Bryan Cotton - Posts: 5035
- Joined: Mon Jul 01, 2013 9:54 pm
- Location: C77
Re: Ken's Sonex 1243
![]() by Sonex1243 » Tue Nov 06, 2018 10:50 pm
by Sonex1243 » Tue Nov 06, 2018 10:50 pm
racaldwell wrote:could you explain a little about what you did wrong in drilling the TI legs? I have that out in front of me and would like to learn what to do and not to do. I cannot tell from your pictures.
Hi Rick,
Just not being patient and thinking it through. After watching the Sonex EAA video, I started with a new 1/8" cobalt bit, filed a flat spot on top of the rod for the bit to be square to the rod and then used a small spring loaded centering punch to make a mark for the drill bit. I gradually stepped up the hole to 1/4" with 5/32", 3/16", 7/32" and finally 1/4".
These were my mistakes:
Not using the "V" block which I finally found later
Not marking a good center line on the rods
Using the drill vise and not using a way (via center line etc.) to make sure the bit was centered on the rod
I used Aluma Prep cutting fluid, the can said good for "mild" steel, but, I think I should have used better fluid for stainless/all metals
The drill bit wanted to wander a bit with the drill press turned on after running it down on the rod with the drill press off to check it hit the centering punch mark
After the fact, I made a centering mark on the rods (DUH) with a sharpie and square to see if the hole bottom came out true, which they didn't
I found myself trying to tweak the rod and position on the drill press to stop the slight drill bit wandering and used light and slow pressures
In hind sight, after thinking about it and watching the video numerous times, I was doomed from the start.
My new plan of attack when the time comes:
The little centering punch I used barely made a mark for the bit to start in. I have purchased a 1/4" centering punch to smack with a light hammer and leave a good indentation on a marked center line with a flat spot at least the width of the 1/8" drill bit to start in flat and square to the rods
I will use the "V" block.
I purchased the right cutting fluid from the local machine shop to use
I'll be marking the center line of the rods with a sharpie
I am also toying with the idea of inserting the legs in the motor mount, once installed and using the mount bolt pattern to drill into the leg and then transfer it to the drill press for final drilling
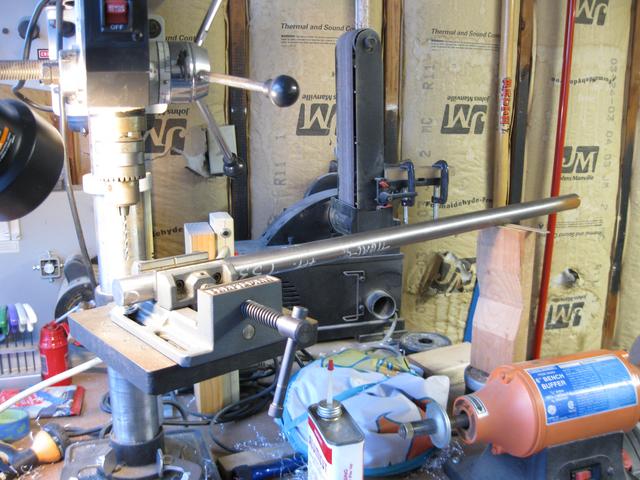
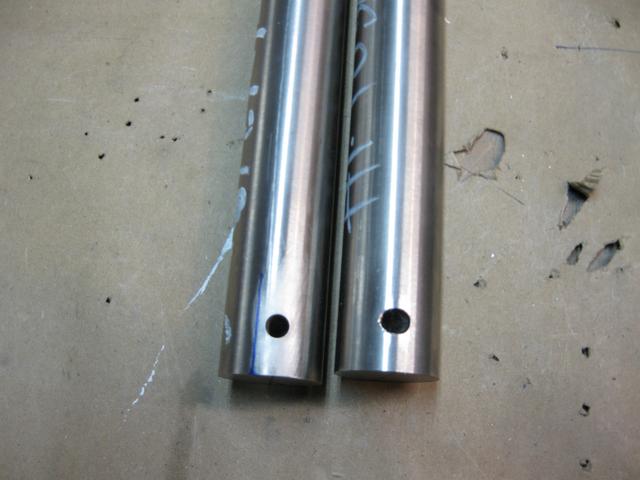
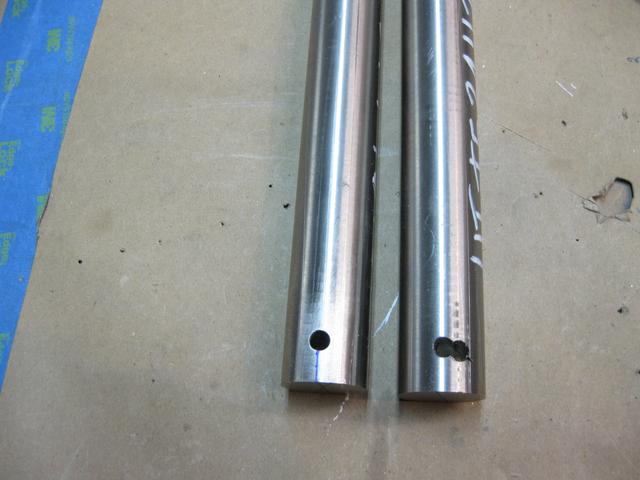
Here are the pictures again a little bigger
Not the best way of setting up the drill press. There were no centering references to go from
Drilled holes after marks were made to check centering. left rod is the bottom off center and right rod is top oblonged after trying to tweak for bit wobble
Holes after centering mark referenced were made. Left rod is the top on center and right rod is bottom result of said tweaking.
Sorry for such a long dissertation, I hope this helps with your legs! I got really frustrated and thought It was going to cost dearly, but, I have a second chance. Will definitely think it through and take my time...
Last edited by Sonex1243 on Tue Nov 06, 2018 10:59 pm, edited 1 time in total.
Ken S
SONEX #1243 N424SX (reserved)
Tail complete, wings done
Fuselage on gear
Jab 3300 received!
SONEX #1243 N424SX (reserved)
Tail complete, wings done
Fuselage on gear
Jab 3300 received!
- Sonex1243
- Posts: 310
- Joined: Thu Jan 08, 2015 4:59 pm
Re: Ken's Sonex 1243
![]() by Sonex1243 » Tue Nov 06, 2018 10:55 pm
by Sonex1243 » Tue Nov 06, 2018 10:55 pm
Bryan Cotton wrote:I am a believer in using a V block to drill holes in round things.
I agree, finally found mine. The trick will be securing the rod in place after bolting the V block to the drill press table. I did take a look at your thread and a lot of others to glean some better practices when round two comes!
Ken S
SONEX #1243 N424SX (reserved)
Tail complete, wings done
Fuselage on gear
Jab 3300 received!
SONEX #1243 N424SX (reserved)
Tail complete, wings done
Fuselage on gear
Jab 3300 received!
- Sonex1243
- Posts: 310
- Joined: Thu Jan 08, 2015 4:59 pm
Re: Ken's Sonex 1243
![]() by Bryan Cotton » Tue Nov 06, 2018 11:40 pm
by Bryan Cotton » Tue Nov 06, 2018 11:40 pm
Bore a hole in a block of wood which matches the diameter of the leg. Then bandsaw out a triangular piece so the round section rides nicely on the gear leg, and the flat section is good for a C clamp.
Bryan Cotton
Poplar Grove, IL C77
Waiex 191 N191YX
Taildragger, Aerovee, acro ailerons
dual sticks with sport trainer controls
Prebuilt spars and machined angle kit
Year 2 flying and approaching 200 hours December 23
Poplar Grove, IL C77
Waiex 191 N191YX
Taildragger, Aerovee, acro ailerons
dual sticks with sport trainer controls
Prebuilt spars and machined angle kit
Year 2 flying and approaching 200 hours December 23
-
Bryan Cotton - Posts: 5035
- Joined: Mon Jul 01, 2013 9:54 pm
- Location: C77
Re: Ken's Sonex 1243
![]() by Area 51% » Wed Nov 07, 2018 8:48 am
by Area 51% » Wed Nov 07, 2018 8:48 am
Went to church a week straight, said enough "Hail Mary"s to require throat lozenges, put a little something extra in the offering plate, and made promises to the "All Mighty" that the Pope couldn't keep. The drill bit still wandered.
The problem with the video tip is they don't show you how to set-up the gear leg for a successful hole. Only how easy it can be to drill through titanium. I'm pretty sure they didn't just throw the vise up on the table and slide it into position by eyeball. Filing a flat spot to keep the drill from wandering is a great policy, but how do you ensure the flat spot is exactly parallel to the earth's surface?
Can I ask why you didn't/don't take the legs to that machine shop you mentioned to at least poke the pilot holes through? It seems that the only group of builders that don't have trouble with drilling the legs are the former/current machine shop operators that have the correct tools at their disposal. There is also that "other" group that has won the lottery multiple times.
I know it's not the same diameter, but I have a section of my first failed tailspring you can have to practice with.
Happy as a clam here with my Tracy O'Brian gear legs @ Area 51%
- Area 51%
- Posts: 733
- Joined: Thu Feb 18, 2016 7:57 am
Re: Ken's Sonex 1243
![]() by dbdevkc » Wed Nov 07, 2018 9:32 am
by dbdevkc » Wed Nov 07, 2018 9:32 am
Bryan Cotton wrote:Bore a hole in a block of wood which matches the diameter of the leg. Then bandsaw out a triangular piece so the round section rides nicely on the gear leg, and the flat section is good for a C clamp.
I'm not sure I follow this - why would you cut out a triangular piece? I would like to get this figured out so when I get to that step, it goes off without a hitch.
[color=#800000]Kevin Conklin
Building Waiex #169
Building Waiex #169
- dbdevkc
- Posts: 193
- Joined: Sun Jun 26, 2011 9:18 am
- Location: Washingtonville, NY
Re: Ken's Sonex 1243
![]() by Sonex1517 » Wed Nov 07, 2018 9:36 am
by Sonex1517 » Wed Nov 07, 2018 9:36 am
Having suffered through this with my gear legs, I would offer a simple solution
https://www.aircraftspruce.com/catalog/ ... ckkey=9233
This jig allows you to set up well-centered holes on round pieces, provides a drill guide, and allows you to clamp the piece.
I loaned mine out and it wandered away, if I can get it back I will put it up for the tool loan program.
My two cents.
https://www.aircraftspruce.com/catalog/ ... ckkey=9233
This jig allows you to set up well-centered holes on round pieces, provides a drill guide, and allows you to clamp the piece.
I loaned mine out and it wandered away, if I can get it back I will put it up for the tool loan program.
My two cents.
Robbie Culver
Sonex 1517
Aero Estates (T25)
First flight 10/10/2015
325+ hours
Jabiru 3300 Gen 4
Prince P Tip
Taildragger
N1517S
Sonex 1517
Aero Estates (T25)
First flight 10/10/2015
325+ hours
Jabiru 3300 Gen 4
Prince P Tip
Taildragger
N1517S
-

Sonex1517 - Posts: 1651
- Joined: Fri Jun 03, 2011 10:11 am
- Location: Chicagoland
Re: Ken's Sonex 1243
![]() by racaldwell » Wed Nov 07, 2018 10:39 am
by racaldwell » Wed Nov 07, 2018 10:39 am
Thanks, Ken, for the explanation. That helps us. I think I'll order the vee block with drill guide like Robbie suggests.
It seems to me that a pilot hole would be started with the leg in the mount until the pilot bit just started to make a little indentation in the leg. Then the leg removed and jigged on the drill press. Wouldn't that little spot where the bit started alleviate the need to center punch and make a flat spot with a file?
Then after the leg is drilled to size, the front hole in the mount is opened up to full size, then the leg reinstalled in the mount and the back hole in the mount drilled? I think that hole has to go through the firewall as there is no space for a nut on the engine side?
Rick C
Xenos 0057
- racaldwell
- Posts: 399
- Joined: Thu May 22, 2014 4:52 pm
Re: Ken's Sonex 1243
![]() by Bryan Cotton » Wed Nov 07, 2018 11:09 am
by Bryan Cotton » Wed Nov 07, 2018 11:09 am
I'm not sure I follow this - why would you cut out a triangular piece? I
So it will fit down into the V block.
Bryan Cotton
Poplar Grove, IL C77
Waiex 191 N191YX
Taildragger, Aerovee, acro ailerons
dual sticks with sport trainer controls
Prebuilt spars and machined angle kit
Year 2 flying and approaching 200 hours December 23
Poplar Grove, IL C77
Waiex 191 N191YX
Taildragger, Aerovee, acro ailerons
dual sticks with sport trainer controls
Prebuilt spars and machined angle kit
Year 2 flying and approaching 200 hours December 23
-
Bryan Cotton - Posts: 5035
- Joined: Mon Jul 01, 2013 9:54 pm
- Location: C77
Re: Ken's Sonex 1243
![]() by Sonex1243 » Wed Nov 07, 2018 1:36 pm
by Sonex1243 » Wed Nov 07, 2018 1:36 pm
Excellent ideas and help everyone, thanks!
Brian,
Great idea, didn't get it at first, now it makes sense.
Area 51%,
I noticed in the video when he demonstrated the punch that there was quite the divot in the rod for a bit. Filing the flat spot is still a concern like you say. Maybe file a flat spot and center punch in the center of that?
As far as the machinist, he has never worked with Ti and was unsure if his drilling would even come out right! He was willing, however, to chuck them up in the lathe and machine the 1/8" and 1/16" off of them since they are over the 34" length. I am leery as there may be some good marks (as he stated) on the rods from the lathe jaws. Once the discussion went further as to what the rods were for, it became a liability concern, I wasn't going to mislead him! I haven't looked into the Tracey O-brians yet.
Robbie,
That tool is a great idea, thanks.
Rick,
My plan "B" was just that, place the legs in the mount after it is installed and make a 1/4" pilot hole using the mount. I think the trick when moving to the drill press is making sure the rod pilot hole is vertical and square to the drill bit so you get a hole straight down the middle. I bet that tool Robbie suggests would do the trick. I will have to run a 1/4" bit in my mount to clear the powder coating though. Once upsized, transfer the hole through the back of the mount.
Ken S
SONEX #1243 N424SX (reserved)
Tail complete, wings done
Fuselage on gear
Jab 3300 received!
SONEX #1243 N424SX (reserved)
Tail complete, wings done
Fuselage on gear
Jab 3300 received!
- Sonex1243
- Posts: 310
- Joined: Thu Jan 08, 2015 4:59 pm
Who is online
Users browsing this forum: No registered users and 39 guests