

random user submitted photo
SNX-W17 aft root rib placement frustration
1 post
• Page 1 of 1
SNX-W17 aft root rib placement frustration
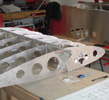
After fitting the SNX-W17 aft root rib with the wing level and squared to 19" from the spar reference hole, my #1 rib had a bow and slight oil canning once reassembled for riveting. This baffled me since the parts were all match hole ribs/pre drilled machined angles.
My construction sequence was:
Ribs 1 - 12 upsized to #30 and clecoed to the (pre assembled) main spar from the aft side.
Rear spar upsized to #30.
Positioned the rear root rib, clecoed forward end, all the matched part holes aligned perfectly with #40 clecoes.
Positioned the rear root rib end to the rear spar fitting by moving the spar inboard enough to align the holes, there was some resistance from the clecoes/ribs meshing on aft side of main spar. Let it relax after clecoing. Only a few match holes were slightly off between the rib and angle, upsizing to #30 would be no problem, clecoed all the #40 holes that aligned.
Removed ribs #1 and #2 for room.
Upsized all the root rib holes to #30 drilling from the angle side.
Disassembled the entire wing frame, deburred, reassembled and riveted the ribs to the main spar.
Reattached the rear spar and rear root rib in preparation for riveting.
Leveled the wing and squared to 19".
This is where the #1 rib began to bow and oil can as the wing was squared. If I released the aft root rib at the rear spar and squared the wing, bow and oil canning go away, but , the rear root rib holes are now 1/4 hole off and the 9/16" from the rib to the spar channel was 2 to 3/32" off from the plans call out. I also tried it the other way by drilling out the 4 rivets on the #1 rib rear angle and let it float while squaring. This had the same result, holes 1/4 off, but, I had the 9/16" from the rib end to the spar channel per the plans.
I opted to re-mark the #1 rib rear angle, re-drill and re-rivet with a .032 backing strip since the 4 rib holes would be slightly oblong. I felt this was easier than re-doing the root rib and trying to re-drill #30's front and rear. This worked very well. re-squared the wing and leveled to the bench top with the rear spar clamped along the edge and forward spar blocked up on each end. No more #1 rib bow or oil canning. I could also install / remove the clecos from the aft root rib end without them binding. I went one step further and clecoed the upper aft wing skin to the trailing edge spar and it looks good to me other than the leading edge of the skin being 1/16' or less from being flush with the leading edge along the forward spar cap and a little more at the tip from #12 rib outboard. Not sure yet if that matters.
The spar still has a slight curve at the tip when leveled, squared and the upper aft skin removed. I think the skin trailing edge removes that when attached along the length of the rear spar?
So, here is the call for a sanity check / suggestions since I keep second guessing myself. I have not riveted the rear spar and rear root rib attach fitting yet since I "think" there is something wrong by re-modifying the #1 rib, or, not re-working the root rib.
Ken S
SONEX #1243 N424SX (reserved)
Tail complete, wings done
Fuselage on gear
Jab 3300 received!
SONEX #1243 N424SX (reserved)
Tail complete, wings done
Fuselage on gear
Jab 3300 received!
- Sonex1243
- Posts: 310
- Joined: Thu Jan 08, 2015 4:59 pm
1 post
• Page 1 of 1
Who is online
Users browsing this forum: No registered users and 1 guest


