


random user submitted photo
Wes's Onex #89
Re: Wes's Onex #89 (Time to Trim)
![]() by WesRagle » Sat Jun 27, 2020 9:58 pm
by WesRagle » Sat Jun 27, 2020 9:58 pm
Hi Guys,
Well, I made it past first flight!! (Ref. http://sonexbuilders.net/viewtopic.php?f=23&t=5722#p43247)
Now, if the wind ever dies down a little I hope to get some more time on the plane. Since it seems senseless to fly it again without making improvements I intend to try to improve the out of rig conditions before flying again.
Of course any observations made during the first few minutes of flight are suspect. There's just too much adrenaline and too much going on. However, I do know that the left wing was heavy. Just how heavy I don't know. So, I'll apply a very slight squeeze to the right aileron before further flight. That should make the plane easier to fly and land while determining just how much more is needed.
I suspect I need some rudder trim but won't be sure until I fly level and get my feet off the peddles. I'm not too worried about the rudder trim. Based on what others have posted it's easy enough to fix with various trim tab designs using VHB tape. An easy fix and easy to change. I could mess with the rudder return springs but I don't fit under the fuel tank very well.
So here are the questions: How much interaction is there between rudder and aileron trim? Does it make sense to fix the roll and then fix the yaw or should it be an iterative process, sneaking up on straight and level?
Thanks,
Wes
Wes Ragle
Onex #89
Conventional Gear
Long Tips
Hummel 2400 w/Zenith Carb
Prince P Tip 54x50
First Flight 06/23/2020
42.8 Hrs. as of 10/30/21
Onex #89
Conventional Gear
Long Tips
Hummel 2400 w/Zenith Carb
Prince P Tip 54x50
First Flight 06/23/2020
42.8 Hrs. as of 10/30/21
- WesRagle
- Posts: 847
- Joined: Fri Jan 05, 2018 12:35 pm
- Location: Weatherford, Tx
Re: Wes's Onex #89
![]() by dirkverdonck » Sun Jun 28, 2020 4:33 am
by dirkverdonck » Sun Jun 28, 2020 4:33 am
Hi Wes,
During the build, I installed a slightly shorter rudder spring on the left to create sort of a pretension as you'll need left foot most of time the engine is producing power. I also experimented with a fixed rudder trim tab that was initially taped and later riveted to the rudder. Both make that in cruise at 2900 revs, I can leave my feet on the ground with the ball centered.
For the heavy left wing, I taped a trim tab to the left aileron that I adjusted and later riveted to the aileron. It took most of the left roll tendency away but there is still some left....
For those who are still building, you may consider to install inspection panels on each side of the cockpit front area to have access to your pedals, springs and fuel system on a later date....
- Attachments
-
- insp panel cocpit.JPG (57.84 KiB) Viewed 21213 times
Dirk Verdonck
Leffinge, Belgium
Onex #117
Taildragger, Aerovee 2.1, MGL iEFIS, TRIG radio and Transponder, electric flaps, external elevator trim, shortened wingtips, hydraulic brakes, hightened seat pan, extra inspection panels, etc
Leffinge, Belgium
Onex #117
Taildragger, Aerovee 2.1, MGL iEFIS, TRIG radio and Transponder, electric flaps, external elevator trim, shortened wingtips, hydraulic brakes, hightened seat pan, extra inspection panels, etc
- dirkverdonck
- Posts: 88
- Joined: Sun Sep 21, 2014 9:01 am
- Location: Leffinge, Belgium
Re: Wes's Onex #89
![]() by Gordon » Mon Jun 29, 2020 9:24 am
by Gordon » Mon Jun 29, 2020 9:24 am
Onex Trim
Wes.....
I had the same trim conditions that you describe with my Onex on the first flight. The left heavy wing and the ball off center.
I squeezed the right aileron trailing edge (a Van's trick) and there was a slight improvement but not enough. Next I tapped an 8" long piece of "balsa trailing edge" material (model airplane store) to the BOTTOM side of the RIGHT aileron at the trailing edge. I still had a slight roll to the left.
I re-checked my flaps and found the right flap was down about 3/8" from "trail" (zero degrees). I changed the flap linkage to get it to zero degrees and shortened the balsa wedge to 6"......now the airplane flies level.....hands off.
The ball was still off center so I tapped a 5" long piece of balsa trailing edge material to the RIGHT side of the rudder (at the trailing edge) near the bottom. The ball is now centered.
Now that the airplane flies straight and level I will make aluminum wedges to duplicate the balsa material and rivet them on.
You may want to try adding spring tension to the rudder pedals and aileron controls similar to the Van's manual aileron trim kit you can buy from Van's (had that on my RV-7) .......but this also works well.
Remember...........KISS. Congrats again on your first flight.
Gordon......Hummel 2400.....Onex 0024....Hobbs 26 hours
- Gordon
- Posts: 178
- Joined: Thu Sep 07, 2017 9:20 pm
Re: Wes's Onex #89
![]() by Onex107 » Mon Jun 29, 2020 10:55 am
by Onex107 » Mon Jun 29, 2020 10:55 am
My Onex is a nose dragger and does not have the original rudder cable springs. Just the two small springs where the cables attach to the nose wheel steering. But, I noticed a "keep the ball in the center" problem also and decided to install rudder and elevator gap fairings/covers. My thinking was that the rudder gap un-balanced the rudder to one side. It's a simple installation and had a definite effect on the tail end. I went ahead with the elevator gaps on the bottom and the first flight required a large trim change which leads me to believe that the down force was being reduced by the gaps also. Ain't EXPERIMENTAL a great way to fly.
OneX 107
N2107X
N2107X
- Onex107
- Posts: 495
- Joined: Mon Mar 24, 2014 6:44 pm
- Location: Peoria, IL
Re: Wes's Onex #89
![]() by inventor » Tue Jun 30, 2020 8:41 am
by inventor » Tue Jun 30, 2020 8:41 am
I have been thinking about doing what you are talking about. Would you be able to send me some pics of your configuration?
Richard
Richard
Onex 150
- inventor
- Posts: 71
- Joined: Tue Jun 09, 2015 8:35 am
- Location: Oregon
Re: Wes's Onex #89
![]() by WesRagle » Tue Jul 07, 2020 7:36 pm
by WesRagle » Tue Jul 07, 2020 7:36 pm
Hi Guys,
Thanks for the trim ideas. And sorry for the late reply, I've been camped out with the Onex without a keyboard.
At this point in my Onex bonding process I need perfect flying conditions. Around here (North Central Texas) this time of year that only happens sometimes in the morning. So, I've only gotten in a couple of flights since first flight. This morning was to be the third but ... while the winds were calm there was fog and light drizzle.
Anyway, as far as the trim is concerned, I probably didn't ask the question very clearly. What I really wanted to know is where to start and how to attack the process of trimming the airplane. After some fooling around and some thought this is what I came up with.
Step One is to check the rigging. When I rigged the flaps and ailerons I simply lined them up with each other and with the wing tips. Turns out that wasn't very smart. My left wing tip is about 1.5 Deg. out of rig, re-flexed, or up. I'll just live with that for now but those who haven't attached the tips yet you would do well to check them and nudge them into rig if possible. I did re-adjust the flap to proper rig.
Step Two will be to fly the airplane straight and level with aileron and rudder. I will attempt to "fix" the heavy wing by squeezing the trailing edge of the light wing's aileron while still applying rudder as necessary to fly straight and level. I'll repeat this process until only rudder is needed to fly straight and level.
Step Three will be adding rudder trim as necessary until I can fly straight and level and drop the stick and put my feet flat on the floor and it stays put.
I really don't have a good feel as to whether or not the trim will be speed sensitive/dependent. I guess I should pick the anticipated cruse speed and perform all tests at that speed and just hope the trim is OK at other speeds.
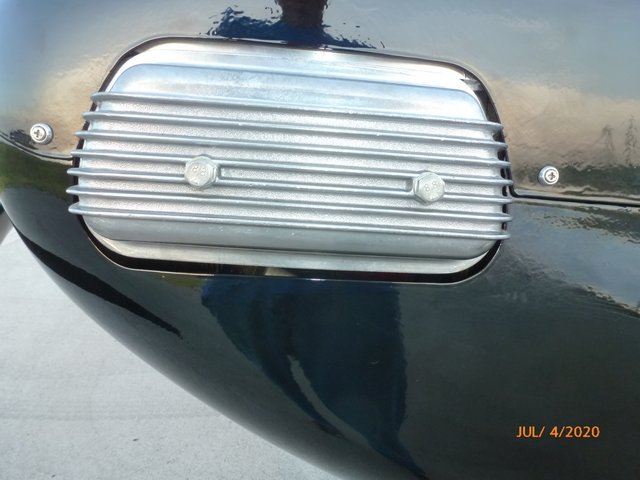
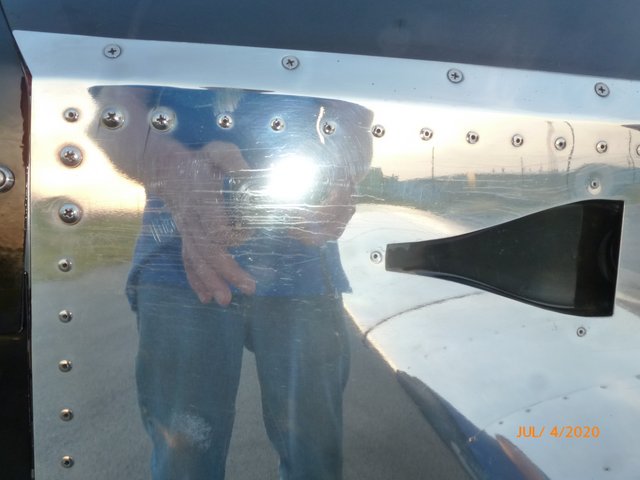
Another problem showed up. I didn't think about it while building the fuse, but I placed my fresh air vent directly behind the left valve cover. While taxiing with the canopy cracked open the air coming in between the windshield and the canopy is noticeably cooler than the air coming through the fresh air vent. I thought it strange that the valve cover could warm the air to the point that I could feel the difference. The air continued to feel too warm throughout the flight. Then another observation: I had a small oil leak at the left valve cover gasket (the one that I didn't replace a couple of weeks ago). The flange of the valve cover is inside the plane of the cowl side yet the oil didn't show up inside the cowl. It showed up as streaks down the side of the airplane. The streaks are centered about the fresh air vent. Although the valve covers are on the low pressure side of the baffling it appears that cylinder cooling air is being sucked out around the cutouts in the cowl sides. Not good. I should point out that my cowl exit isn't per plans. That's a side effect of my Hummel installation. I have no idea if the same situation exists with the standard cowl exit.
A pic of the cutout showing the valve cover flanges inside the cowl:
A pic showing the oil streaks down the fuse side:
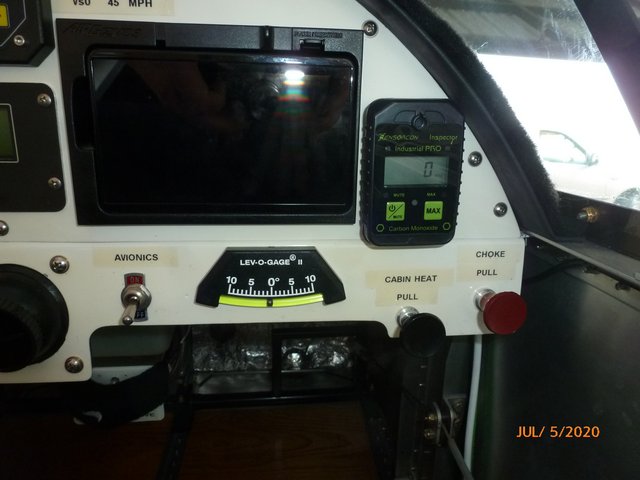
After I get the airplane trimmed out I'll work on the geometry of the cowl exit and see if I can get enough suck to keep the cylinder head cooling air out of the cockpit. In the mean time I have installed a CO sensor and a "Slip/Skid" to the instrument panel to support further testing. I have a manometer on order to test various cowl exit geometries.
More fancy instruments :-):
Forever Forward,
Wes
Thanks for the trim ideas. And sorry for the late reply, I've been camped out with the Onex without a keyboard.
At this point in my Onex bonding process I need perfect flying conditions. Around here (North Central Texas) this time of year that only happens sometimes in the morning. So, I've only gotten in a couple of flights since first flight. This morning was to be the third but ... while the winds were calm there was fog and light drizzle.
Anyway, as far as the trim is concerned, I probably didn't ask the question very clearly. What I really wanted to know is where to start and how to attack the process of trimming the airplane. After some fooling around and some thought this is what I came up with.
Step One is to check the rigging. When I rigged the flaps and ailerons I simply lined them up with each other and with the wing tips. Turns out that wasn't very smart. My left wing tip is about 1.5 Deg. out of rig, re-flexed, or up. I'll just live with that for now but those who haven't attached the tips yet you would do well to check them and nudge them into rig if possible. I did re-adjust the flap to proper rig.
Step Two will be to fly the airplane straight and level with aileron and rudder. I will attempt to "fix" the heavy wing by squeezing the trailing edge of the light wing's aileron while still applying rudder as necessary to fly straight and level. I'll repeat this process until only rudder is needed to fly straight and level.
Step Three will be adding rudder trim as necessary until I can fly straight and level and drop the stick and put my feet flat on the floor and it stays put.
I really don't have a good feel as to whether or not the trim will be speed sensitive/dependent. I guess I should pick the anticipated cruse speed and perform all tests at that speed and just hope the trim is OK at other speeds.
Another problem showed up. I didn't think about it while building the fuse, but I placed my fresh air vent directly behind the left valve cover. While taxiing with the canopy cracked open the air coming in between the windshield and the canopy is noticeably cooler than the air coming through the fresh air vent. I thought it strange that the valve cover could warm the air to the point that I could feel the difference. The air continued to feel too warm throughout the flight. Then another observation: I had a small oil leak at the left valve cover gasket (the one that I didn't replace a couple of weeks ago). The flange of the valve cover is inside the plane of the cowl side yet the oil didn't show up inside the cowl. It showed up as streaks down the side of the airplane. The streaks are centered about the fresh air vent. Although the valve covers are on the low pressure side of the baffling it appears that cylinder cooling air is being sucked out around the cutouts in the cowl sides. Not good. I should point out that my cowl exit isn't per plans. That's a side effect of my Hummel installation. I have no idea if the same situation exists with the standard cowl exit.
A pic of the cutout showing the valve cover flanges inside the cowl:
A pic showing the oil streaks down the fuse side:
After I get the airplane trimmed out I'll work on the geometry of the cowl exit and see if I can get enough suck to keep the cylinder head cooling air out of the cockpit. In the mean time I have installed a CO sensor and a "Slip/Skid" to the instrument panel to support further testing. I have a manometer on order to test various cowl exit geometries.
More fancy instruments :-):
Forever Forward,
Wes
Wes Ragle
Onex #89
Conventional Gear
Long Tips
Hummel 2400 w/Zenith Carb
Prince P Tip 54x50
First Flight 06/23/2020
42.8 Hrs. as of 10/30/21
Onex #89
Conventional Gear
Long Tips
Hummel 2400 w/Zenith Carb
Prince P Tip 54x50
First Flight 06/23/2020
42.8 Hrs. as of 10/30/21
- WesRagle
- Posts: 847
- Joined: Fri Jan 05, 2018 12:35 pm
- Location: Weatherford, Tx
Re: Wes's Onex #89
![]() by Gordon » Wed Jul 08, 2020 9:38 am
by Gordon » Wed Jul 08, 2020 9:38 am
Hey Wes......lots of stuff to figure out with a new airplane.
I had the same oil leaks (seepage?) along the sides of the fuse on my Onex. After a close look I discovered it was coming from those 2 bolts holding on the valve covers. It was not leaking at the big cork valve cover gaskets.
I removed the bolts (one at a time), cleaned the area around the bolt head, run a fine line of Ultra Black RTV gasket maker under the bolt head and re-installed.
That was the end of the oil down the side of the fuselage. That might be something to try.
Gordon........Hummel 2400......Onex #0024
- Gordon
- Posts: 178
- Joined: Thu Sep 07, 2017 9:20 pm
Re: Wes's Onex #89
![]() by WesRagle » Wed Jul 08, 2020 12:58 pm
by WesRagle » Wed Jul 08, 2020 12:58 pm
Hi Gord,
Thanks for the tip. I haven't noticed any oil around the bolts or on the valve cover but .. I will certainly add some sealant when I remove the covers for the 10 Hr. head torque and oil change.
Wes
Thanks for the tip. I haven't noticed any oil around the bolts or on the valve cover but .. I will certainly add some sealant when I remove the covers for the 10 Hr. head torque and oil change.
Wes
Wes Ragle
Onex #89
Conventional Gear
Long Tips
Hummel 2400 w/Zenith Carb
Prince P Tip 54x50
First Flight 06/23/2020
42.8 Hrs. as of 10/30/21
Onex #89
Conventional Gear
Long Tips
Hummel 2400 w/Zenith Carb
Prince P Tip 54x50
First Flight 06/23/2020
42.8 Hrs. as of 10/30/21
- WesRagle
- Posts: 847
- Joined: Fri Jan 05, 2018 12:35 pm
- Location: Weatherford, Tx
Re: Wes's Onex #89
![]() by dirkverdonck » Thu Jul 09, 2020 3:29 am
by dirkverdonck » Thu Jul 09, 2020 3:29 am
Hi Wes,
I installed O-rings under the bolt heads, no leaks. Just replace them every time you remove the cover.
I installed O-rings under the bolt heads, no leaks. Just replace them every time you remove the cover.
Dirk Verdonck
Leffinge, Belgium
Onex #117
Taildragger, Aerovee 2.1, MGL iEFIS, TRIG radio and Transponder, electric flaps, external elevator trim, shortened wingtips, hydraulic brakes, hightened seat pan, extra inspection panels, etc
Leffinge, Belgium
Onex #117
Taildragger, Aerovee 2.1, MGL iEFIS, TRIG radio and Transponder, electric flaps, external elevator trim, shortened wingtips, hydraulic brakes, hightened seat pan, extra inspection panels, etc
- dirkverdonck
- Posts: 88
- Joined: Sun Sep 21, 2014 9:01 am
- Location: Leffinge, Belgium
Re: Wes's Onex #89
![]() by GraemeSmith » Thu Jul 09, 2020 8:16 am
by GraemeSmith » Thu Jul 09, 2020 8:16 am
dirkverdonck wrote:Hi Wes,
I installed O-rings under the bolt heads, no leaks. Just replace them every time you remove the cover.
Me too. The VW part is not worth much. Cuts very easily. Can't be reused.
I keep a big pack of assorted Nitrile O Rings and fit three of reducing size in a taper over the bolt under a washer. It snugs nicely into the recess in the cover. Also don't over-torque to try and get the perimeter gasket to seal. Then it leaks out the bolt head.
Graeme JW Smith
-

GraemeSmith - Posts: 939
- Joined: Sat May 18, 2019 8:58 am
- Location: RI
Who is online
Users browsing this forum: No registered users and 5 guests