
random user submitted photo
Wes's Onex #89
Re: Wes's Onex #89
Hi Wes,
I installed nutplates in the main cross tie box before closing it up and also a row on the top of the first cross member. I then measured and cut the forward and rear sheets, adding a lip to the top and bottom facing opposite directions; the top lip to the outside of the box so the box 'hangs' on the lips and is secured in place with the nutplates, the bottom lip will hold the plywood bottom plate. On the vertical side, I folded lips to the inside of the box and added nutplates to the back of them to hold the sideplates.
I then measured the size of the sideplates and added a large lip on top folded to the outside to close the gap between the sidewall and the box and lips on the bottom side facing inwards to hold the bottom plywood sheet.
Once all for side are installed, you will have four bottom lips surrounding the box that will hold your plywood sheet in which I drilled a hole and inserted a piece of rope with a nut underneath to pull the sheet upward for inspection purposes.
As my box is already installed and I have no more pics available, this is the only information I can add.
Make sure you measure at least four times before you cut any metal as the box is not square but has a conical shape!
Dirk Verdonck
Leffinge, Belgium
Onex #117
Taildragger, Aerovee 2.1, MGL iEFIS, TRIG radio and Transponder, electric flaps, external elevator trim, shortened wingtips, hydraulic brakes, hightened seat pan, extra inspection panels, etc
Leffinge, Belgium
Onex #117
Taildragger, Aerovee 2.1, MGL iEFIS, TRIG radio and Transponder, electric flaps, external elevator trim, shortened wingtips, hydraulic brakes, hightened seat pan, extra inspection panels, etc
- dirkverdonck
- Posts: 88
- Joined: Sun Sep 21, 2014 9:01 am
- Location: Leffinge, Belgium
Re: Wes's Onex #89
Hi Dirk,
Thanks a lot. I have read and will re-read. I'll improvise and adapt to fit my situation.
Speaking of measure trim remeasure and trim again ... I'm still doing little things that I've been putting off.
I decided long ago that I wanted to try and streamline the landing gear. I did that but..., I have been ignoring the fact that the fairing just ended at the upper bend in the landing gear. Today was the day of reckoning.
I spent almost all day going from this:
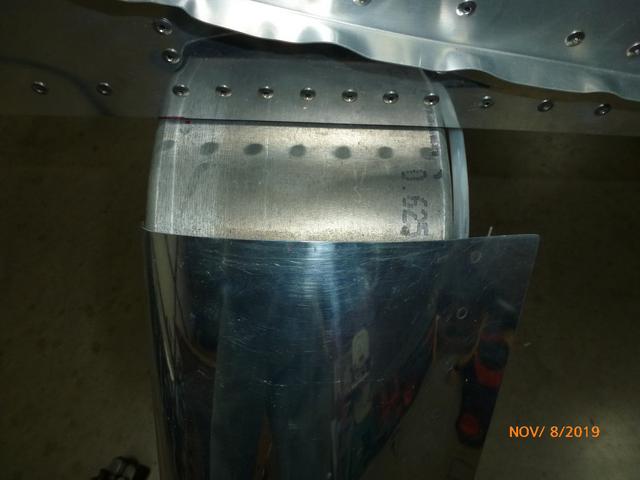
To this:
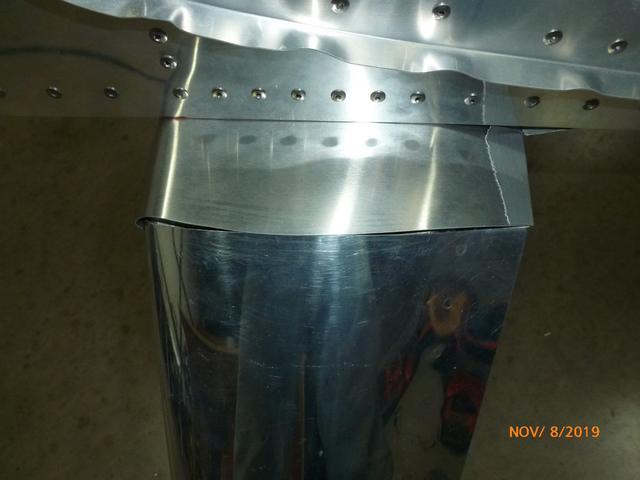
Times two.
It's a little bit cheesy but I had to do something. I'm still not finished but getting close. Even when I'm finished I won't be finished :-) I need to make a small fiberglass fairing to cover the intersection of the two sheet metal fairings. I'm getting a bit weary of my "good ideas".
I also installed the NACA duct for cabin air and plumbed it to the eyeball. The NACA was fitted long ago just not installed.
Forever Forward,
Wes
Thanks a lot. I have read and will re-read. I'll improvise and adapt to fit my situation.
Speaking of measure trim remeasure and trim again ... I'm still doing little things that I've been putting off.
I decided long ago that I wanted to try and streamline the landing gear. I did that but..., I have been ignoring the fact that the fairing just ended at the upper bend in the landing gear. Today was the day of reckoning.
I spent almost all day going from this:

To this:

Times two.
It's a little bit cheesy but I had to do something. I'm still not finished but getting close. Even when I'm finished I won't be finished :-) I need to make a small fiberglass fairing to cover the intersection of the two sheet metal fairings. I'm getting a bit weary of my "good ideas".
I also installed the NACA duct for cabin air and plumbed it to the eyeball. The NACA was fitted long ago just not installed.
Forever Forward,
Wes
Wes Ragle
Onex #89
Conventional Gear
Long Tips
Hummel 2400 w/Zenith Carb
Prince P Tip 54x50
First Flight 06/23/2020
42.8 Hrs. as of 10/30/21
Onex #89
Conventional Gear
Long Tips
Hummel 2400 w/Zenith Carb
Prince P Tip 54x50
First Flight 06/23/2020
42.8 Hrs. as of 10/30/21
- WesRagle
- Posts: 890
- Joined: Fri Jan 05, 2018 12:35 pm
- Location: Weatherford, Tx
Re: Wes's Onex #89
Wes,
Nice. You are as nuts as I am!
Nice. You are as nuts as I am!
Bryan Cotton
Poplar Grove, IL C77
Waiex 191 N191YX
Taildragger, Aerovee, acro ailerons
dual sticks with sport trainer controls
Prebuilt spars and machined angle kit
Year 2 flying and approaching 200 hours December 23
Poplar Grove, IL C77
Waiex 191 N191YX
Taildragger, Aerovee, acro ailerons
dual sticks with sport trainer controls
Prebuilt spars and machined angle kit
Year 2 flying and approaching 200 hours December 23
-

Bryan Cotton - Posts: 5469
- Joined: Mon Jul 01, 2013 9:54 pm
- Location: C77
Re: Wes's Onex #89
I have my landing gear bolted on too but now have to remove to rivet the wing skins.
Onex 150
- inventor
- Posts: 71
- Joined: Tue Jun 09, 2015 8:35 am
- Location: Oregon
Re: Wes's Onex #89
Seems like a lot of work to pull the gear off for 6 rivets-3 on each side. You might consider as Wes mentioned to put the rivets at the gear location in backwards(heads inside the wing rib). One other consideration might be structural epoxy like 3M 2216 in that location. I am using 2216 on a current build as recommended by the designer and it is used in many structural connections with no other mechanical fasteners.
Loren Sievila
Conventional Gear Onex33
CAMit 2200
Dynon Skyview
Conventional Gear Onex33
CAMit 2200
Dynon Skyview
- lgsievila
- Posts: 160
- Joined: Fri Feb 19, 2016 12:54 am
Re: Wes's Onex #89
There is always another way to skin a cat. I am going to remove my gear though and take advantage of the opportunity to counter bore the gear bolt holes that don't seat down flush because of interference with the web of the attachment angles. Thanks for the suggestions.
Onex 150
- inventor
- Posts: 71
- Joined: Tue Jun 09, 2015 8:35 am
- Location: Oregon
Re: Wes's Onex #89
Bryan Cotton wrote:Wes,
Nice. You are as nuts as I am!
Thanks Bryan,
The whole time I was working on the fairings I kept thinking of Bryan's Bane :-)
Hi "Inventor"
inventor wrote:I have my landing gear bolted on too but now have to remove to rivet the wing skins.
For me, not this side of eternity. It may be my just reward but I have a little time left. I have considered back riveting but I need to borrow (or buy) a double offset back set rivet set. Anything but remove the gear (again).
inventor wrote:There is always another way to skin a cat. I am going to remove my gear though and take advantage of the opportunity to counter bore the gear bolt holes that don't seat down flush because of interference with the web of the attachment angles. Thanks for the suggestions.
Counter boring into the fillet of a major structural member of the fuselage doesn't sound like a very good idea to me. Much easier (and better?) to bevel some washers to conform to the fillet.
And no offense, really, but I wish folks would always use their real name. I keep feeling like I should end this message with 10-4 good buddy.
Wes
Wes Ragle
Onex #89
Conventional Gear
Long Tips
Hummel 2400 w/Zenith Carb
Prince P Tip 54x50
First Flight 06/23/2020
42.8 Hrs. as of 10/30/21
Onex #89
Conventional Gear
Long Tips
Hummel 2400 w/Zenith Carb
Prince P Tip 54x50
First Flight 06/23/2020
42.8 Hrs. as of 10/30/21
- WesRagle
- Posts: 890
- Joined: Fri Jan 05, 2018 12:35 pm
- Location: Weatherford, Tx
Re: Wes's Onex #89
Hi Guys,
Well, it was one of those red letter days for me. Finally pulled the Onex out of the shop, tied it to a tree and fired it up.
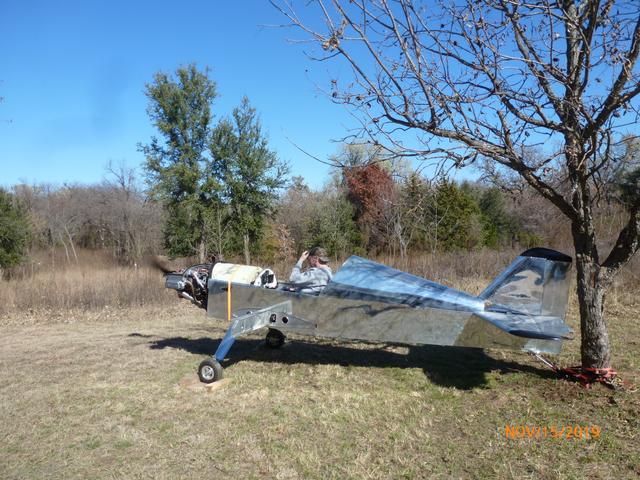
Haven't adjusted the jets yet, just wanted to see all indications behave normally so I can start covering up the front of the airplane. With the main jet at it's "default" setting of 3 1/2 turns out and WOT I was seeing 3180 RPM and EGT of about 1350 with a Prince P-Tip 54-50. I feel pretty good with that.
I did do a quick check of the Carb Heat and got about 25 Fahrenheit Deg. rise @ 2800 RPM. The flapper couldn't seal all the way with a thermocouple stuck in the front but 25 Deg is probably close. Hope to get another 25 at cruise power with the engine cowled up. We'll see.

With all wiring/sensors tested, I can finally put the glare shield on so I can put the windshield on, so I can put the ...
Forever Forward,
Wes
Well, it was one of those red letter days for me. Finally pulled the Onex out of the shop, tied it to a tree and fired it up.

Haven't adjusted the jets yet, just wanted to see all indications behave normally so I can start covering up the front of the airplane. With the main jet at it's "default" setting of 3 1/2 turns out and WOT I was seeing 3180 RPM and EGT of about 1350 with a Prince P-Tip 54-50. I feel pretty good with that.
I did do a quick check of the Carb Heat and got about 25 Fahrenheit Deg. rise @ 2800 RPM. The flapper couldn't seal all the way with a thermocouple stuck in the front but 25 Deg is probably close. Hope to get another 25 at cruise power with the engine cowled up. We'll see.

With all wiring/sensors tested, I can finally put the glare shield on so I can put the windshield on, so I can put the ...
Forever Forward,
Wes
Wes Ragle
Onex #89
Conventional Gear
Long Tips
Hummel 2400 w/Zenith Carb
Prince P Tip 54x50
First Flight 06/23/2020
42.8 Hrs. as of 10/30/21
Onex #89
Conventional Gear
Long Tips
Hummel 2400 w/Zenith Carb
Prince P Tip 54x50
First Flight 06/23/2020
42.8 Hrs. as of 10/30/21
- WesRagle
- Posts: 890
- Joined: Fri Jan 05, 2018 12:35 pm
- Location: Weatherford, Tx
Re: Wes's Onex #89
Congrats Wes! Glad you didn't put out too much power and uproot the tree on your head =D. So satisfying when you fire the thing up and it WORKS!
Ryan Roth
N197RR - Waiex #197 (Turbo Aerovee Taildragger)
Knoxville, TN (Hangar at KRKW)
My project blog: http://www.rynoth.com/wordpress/waiex/
Time-lapse video of my build: https://www.youtube.com/watch?v=Q8QTd2HoyAM
N197RR - Waiex #197 (Turbo Aerovee Taildragger)
Knoxville, TN (Hangar at KRKW)
My project blog: http://www.rynoth.com/wordpress/waiex/
Time-lapse video of my build: https://www.youtube.com/watch?v=Q8QTd2HoyAM
-

Rynoth - Posts: 1308
- Joined: Fri Jul 26, 2013 1:32 pm
- Location: Knoxville, TN
Re: Wes's Onex #89
Awesome!
Bryan Cotton
Poplar Grove, IL C77
Waiex 191 N191YX
Taildragger, Aerovee, acro ailerons
dual sticks with sport trainer controls
Prebuilt spars and machined angle kit
Year 2 flying and approaching 200 hours December 23
Poplar Grove, IL C77
Waiex 191 N191YX
Taildragger, Aerovee, acro ailerons
dual sticks with sport trainer controls
Prebuilt spars and machined angle kit
Year 2 flying and approaching 200 hours December 23
-

Bryan Cotton - Posts: 5469
- Joined: Mon Jul 01, 2013 9:54 pm
- Location: C77
Who is online
Users browsing this forum: No registered users and 1 guest


